

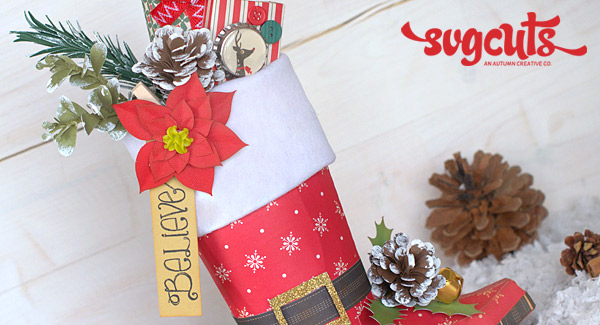


It’s already July… which means that you only have a few more months left of ‘leisurely’ Christmas crafting. I think of making fun projects last minute but by that time, it’s usually too late and don’t have time. So why not get an early start year? Here’s a fun project that puts a twist on the cowboy boot – that would be a perfect ‘stocking’ to stuff little goodies for gift giving!
SVG Collections Used
![]() Happy Trails SVG Kit
Happy Trails SVG Kit
![]() 3D Wintergreens SVG Kit
3D Wintergreens SVG Kit
![]() Buckles SVG Collection
Buckles SVG Collection
![]() Free SVG File - ATC Mailer Box (06.28.11)
Free SVG File - ATC Mailer Box (06.28.11)
Supplies Used
- AC Cardstock
- Cosmo Cricket Dear Mr. Santa paper collection
- Glitter Paper – Gold
- SVG Cuts co-brand Unity Stamp Company Stamps – Gingerbread Kisses
- Snow Writer (dimensional snow pen) or white paint
- Ink for distressing
- Felt (white) (12” w by 5” h)
- Bell
- Clothespin
- Bottlecap
- Cabochon
- Epiphany Crafts Round 25 Shape Tool and Epoxy
- Buttons
- Scotch Quick-dry glue
- Heat glue gun
Dimensions
| Happy Trails SVG Kit (3D Cowboy Boot) | ||
| side_panels.svg | 9.2" w | red patterned paper |
| sole.svg | 7.5" w | red patterned paper |
| boot1.svg | 11.0" w | red patterned paper |
| boot2.svg | 11.0" w | red patterned paper |
| Buckles SVG Collection | ||
| rectangle1.svg | 1.4" w x 1.28" h | gold glitter |
| 3D Wintergreens SVG Kit | ||
| boxwood.svg | 10.0" w (cut 2) | moss green |
| evergreen.svg | 11.3" w | forest green |
| evergreen_ferny.svg | 4.75" w | khaki |
| holly.svg | 4.0" w | light green |
| pinecone.svg | 6.0" w and 6.5" w | dark brown |
| poinsettia.svg | 5.0" w | deep red |
| Free SVG File - ATC Mailer Box (06.28.11) | ||
| atc_mailer_box.svg | 4.75" and 5.5" w | various patterned paper |
| Basic Shapes Library | ||
| rectangle | 9.0" w x 0.75" h | black patterned paper |
Instructions
- Cut boot and assemble. Ink to distress the boot.
- Cut buckle and rectangle strip. Thread the strip through the belt and adhere around the boot.
- Fold over an inch of the white felt horizontally across and using heat glue, adhere. Use the folded side (inner flap facing in) as the outer bottom end and carefully wrap around the boot and adhere the top flap to the inside. This gives a clean felt edge bottom on the boot. Since the original boot file has a rounded top, cover it so that it’s evenly straight at the top.
- Cut all wintergreen files, assemble and apply Snow Writer or paint at the tips.
- Cut ATC boxes, assemble and embellish as necessary.
- If you are making this as a décor item – stuff the bottom of the boot with newspaper. Place all the items (wintergreens and gift boxes) on top inside the boot and adhere. The poinsettia was adhered to the clothespin.
- Stamp sentiment, and clip it onto the clothespin.
Design Tips

Thienly - SVGCuts Design Team Artist
- Use a color core cardstock to ‘mask’ the various pieces glued together to make the boot. For me – I used patterned paper that had a white core, so I used ink to ‘cover’ the pieces and to ‘distress’ the boot.
- Keep the ‘color combo’ clean and simple. Since this project is ‘busy’ and have lots of details, don’t introduce too many colors. This is help ‘tie’ in the project together.
- Don’t try to be ‘perfect’ when you add snow or white paint to the edges, if you want to achieve the natural look of the snow.
- You can even change the sizes of the boot – to match with the family members. Wouldn’t it be so cute to make a papa boot, mama boot and a baby boot?
Have fun ‘customizing’ each boot. For example, you can add a bow for a girl’s boot, or instead of filling it with wintergreens, add some toy embellishment cut outs for kids’ boots. One can even just stuff the inside with real gifts!
So many possibilities with one boot file! Have fun making your own and be sure to share your creations with us on the SVG Cuts Facebook page!
2 Responses to “Santa Boot Stocking by Thienly Azim”