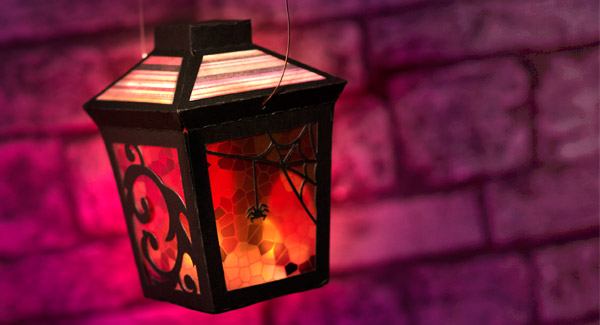
Rarely do I get the opportunity to actually create something with our files, but with Halloween being my favorite time of the year, I had to take advantage and make this spooky lantern using our Crisp Days of Fall SVG Kit and some elements from our Gothic Flourishes SVG Collection! I've even put together a video to show you exactly how I welded everything together! Remember that you can customize this lantern for any and every occasion! I created the stained glass with a graphic that I created in Photoshop and printed out on transparency paper.
SVG Collections Used
![]() Crisp Days of Fall SVG Kit
Crisp Days of Fall SVG Kit
![]() Gothic Flourishes SVG Collection
Gothic Flourishes SVG Collection
Cutting Machine Used
Supplies Used
- Two pieces of black AC Cardstock
- One piece of patterned paper for the accents
- One sheet of transparency paper (for stained glass printout)
- Printer (or vellum if not using stained glass printout)
- Copper wire for the handle
- Stained Glass Graphic (Right Click - Save As)
Dimensions
Here are the exact shapes, sizes and colors I used.
| Crisp Days of Fall SVG Kit (blank lantern in Extras folder) | ||
| lantern1.svg | 9.5" wide | black |
| lantern2.svg | 9.5" wide | black |
| accents1.svg | 9.5" wide | Halloween Paper |
| accents2.svg | 9.5" wide | Halloween Paper |
| vellum2.svg | 9.5" wide | use as guide to cut out stained glass graphic |
| Gothic Flourishes SVG Collection | ||
| cobweb_corner1.svg (weld to lantern) | 3" wide | black |
| cobweb_corner2.svg (weld to lantern) | 3.4" wide | black |
| flourish13.svg (weld to lantern) | 3.16" wide | black |
Instructions
- Cut all of the pieces from the table above. Use the SCAL Instructions video below to help you weld elements to the blank lantern template.
- Print the "Stained Glass Graphic" on a piece of transparency paper. Place the vellum svg file on top of the Stained Glass Graphic and use it as a guide to cut the transparency paper to fit the lantern window.
- Follow the assembly instructions for the lantern. You can find them on the Crisp Days of Fall SVG Kit product page. Click Here
Welding Instructions
I didn't do anything special as far as embossing or embellishing goes. It's just card stock, some accent paper on top and the stained glass transparency paper that give this lantern it's spooky feel.
Happy Halloween everyone! ~ Leo


5 Responses to “Spooky Lantern by Leo Kowal”