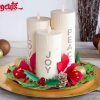
Create this beautiful candle centerpiece to spruce up your table or fireplace mantel this coming Christmas season. This would also make a unique gift idea for someone special!
SVG Collections Used
![]() 3D Wintergreens SVG Kit
3D Wintergreens SVG Kit
![]() Home for the Holidays SVG Kit
Home for the Holidays SVG Kit
![]() Mom's Garden Gifts SVG Kit
Mom's Garden Gifts SVG Kit
![]() Stars and Stripes SVG Kit
Stars and Stripes SVG Kit
![]() Silent Night SVG Kit
Silent Night SVG Kit
Supplies Used
- AC Cardstock
- Vellum
- White and Brown Ink Pad
- Green and Red Stickles Glue
- Green and Red rhinestones
- Scotch Quick-dry glue
- Hot glue and gun
- Embossing machine and folder
- Battery operated LED tea lights
Dimensions
| 3D Wintergreens SVG Kit | ||
| (Pinecone) | ||
| pinecone.svg | 5.455? H x 5.430? W | Kraft |
| (Holly and Berries) | ||
| berries.svg | 5.000" H x 1.013" W | Red (cut 3) |
| holly.svg | 5.000" H x 3.801" W | Green (cut 3) |
| Home for the Holidays SVG Kit | ||
| (Amaryllis in Pitcher - Amaryllis Blossom) | ||
| petals_stamen.svg | 5.859" H x 6.013" W | Red (cut 3) |
| stigma.svg | 0.753" H x 0.868" W | Yellow (cut 3) |
| Mom's Garden Gifts SVG Kit | ||
| (Flower Pot) | ||
| saucer.svg | 17.315" H x 13.380" W | Red Checkered Pattern |
| saucer_rim.svg | 10.659" H x 10.703" W Red | |
| Stars and Stripes SVG Kit | ||
| (Firecracker) | ||
| bottom.svg | 9.220" H x 9.000" W | Ivory *see instructions for sizes of other two candles* |
| lid.svg | 5.062" H x 9.000" W | Ivory |
| Silent Night SVG Kit | ||
| (Wreath Card) | ||
| wreath.svg | 23.493" H x 12.057" W | Green |
| Basic Shapes Library | ||
| rectangle | 5.039" H x 2.626" W | Vellum (cut 3) |
| circle | 0.5" H x 0.5" W | Ivory |
| circle | 0.7" H x 0.7" W | Ivory |
Instructions
Candles
- Open the bottom.svg from Stars and Stripes Firecracker. Ungroup and delete the stars and the fuse. Regroup the body of the firecracker (candle) with its cut lines. * If creating two more candles you will want to copy and paste two more or what you just created including the circles, set them aside before going on to the next step*
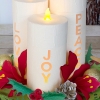
- To the shortest candle, add your text to the candle by using your text function. The font I used is called COUTURE. Ensure you space the letters evenly keeping them vertically aligned. Group your word together and center it onto the body of the candle. Group the word and the candle together.
- For the next two candles you will need to resize the body of the candle. Increase the measurements of the middle candle to 7.334” H x 8.915” W and for the tallest candle 8.334” H x 8.915” W. Repeat the process in step 2 to add your lettering.
- When you cut out the body of your candle keep the little letter cut outs. You will need them in the next step.
- Create a rectangle from your basic shapes library with the measurements indicated above. Cut out 3 rectangle vellum pieces.
- Glue the vellum to the inside of the body of the candle. To neatly add the inside of the letters to the front side of the candle place your letters back onto the cut areas. Only glue the inside cuts of the letters. Remove the letters once inside cuts of the letter is adhered.
- Assemble the base of the candle.
- To the lid of the firecracker (candle) ungroup the 3 pieces. Regroup the strip of the lid with its cut lines.
- Delete the little triangle cut out from the larger circle. Create a 0.5” circle from the basic shapes library. Center that circle onto the top of the larger circle from the lid. Group circles together. Repeat the same process with a 0.7” circle onto the smaller circle of the lid.
- Cut out 2 more lids for the other candles.
- Emboss the strip of the lid before assembling the lid if desired. Assemble the lid/s.
- Add a couple of hot glue drops to the top of a battery operated tea light. Poke the flame of the tea light through the opening of the lid. Hold in place until glue sets, repeat with other candles.
- Add another tea light to the inside of the candle to add a glow to the cut out letters.
Plate
- Open the saucer.svg file from Mom’s Garden Gift’s SVG Kit. Size as indicated above. Ungroup all three pieces in order to cut out on a 12×12 mat. *To add extra strength to the plate, you may want to cut out 2 of each of the circles from this file or use chipboard.*
- Open saucer_rim.svg. Resize, cut out and assemble the plate.
Wreath
- Open wreath.svg from Silent Night SVG Kit. Resize the file. Ungroup and delete the bottom/larger wreath. Do not delete the little holly leaves. Regroup them with their cut lines. Cut out smaller wreath and holly leaves. Set aside.
Accents
- Resize, cut out and assemble the holly and berries, pinecone and amaryllis. Embellish each as desired.
Once you have all the pieces cut out and assembled begin by gluing the wreath to the outer edge of the saucer/plate. (The wreath will not sit flat as the plate has an angled edge. Don’t worry as long as the middle of the wreath is glued flat on the plate, this will keep the candles level.) Glue down your candles to the center of the plate. Make sure your words are aligned as you want to see them before attaching them to the base. Add your accents around the base of the candles. Embellish as much as you like!
Design Tips
- When assembling the body of the candle I found it easier to use two clamps to hold the cylinder together while the glue dried.
- When putting the lid together wrap the strip of the lid along the base of the candle you just created then glue the tab of the strip. This will ensure that the lid fits correctly onto the bottom part of the candle. I found the lid to be very snug fitting, so make sure the body of the candle is glued correctly or the lid may not slide on easily!
- Don’t want to make 3 candles? Make one! Make it as tall and as wide as your paper will allow. Personalize the candle to say whatever you like, for whatever theme you need! I think a family’s last name would be a cool gift idea!
- Another way you could simplify this idea is to place the candle inside a glass cylinder and fill the base with pinecones, berries or whatever you choose. Don’t limit yourself to Christmas, make it for a Fall table scape and add acorns or for a year round look add some glass beads to match your décor. The ideas for this are endless!
Hope this little Christmas Candle Centerpiece has inspired you to create your own table scape masterpiece for your next holiday or event!





2 Responses to “Christmas Candle Centerpiece by Ilda Dias”